balance, brunch, easy, gluten free, quick, recipe, snacks, vegan, vegetarian

Tropical Oat Bars

img_3226

Sometimes, you want to eat seasonally, like enjoying ice cream in the summer to beat the heat, or cozy up with a hot bowl of soup in the winter to warm up. And sometimes, it just gets so damn cold that you decide to protest the weather and fantasize about a dreamy tropical getaway and have to make some snacks that help you do just that.

I don’t really do new year’s resolutions, but I almost always go refined sugar free in January as a body refresh and reset. I do pretty well at resisting the baked goods during the holidays but even I occasionally find myself indulging in more than my fair share of homemade cinnamon rolls, pumpkin pie and holiday cookies. I am a firm believer in enjoying your food always and embracing the treats of the season are a part of enjoying time with family and remembering traditions. That doesn’t mean that I don’t appreciate a break from it all come January.

Going refined sugar free works really well for me, I work well with boundaries and telling myself that I am not having something is often easier than I will eat less of something.

I love snacking on whole foods when I’m running between school, work or just heading to a workout, but many bars you find in stores are loaded with extra sugar or just weird ingredients. That, and I can make my own bars in about 15 minutes for a lot less.

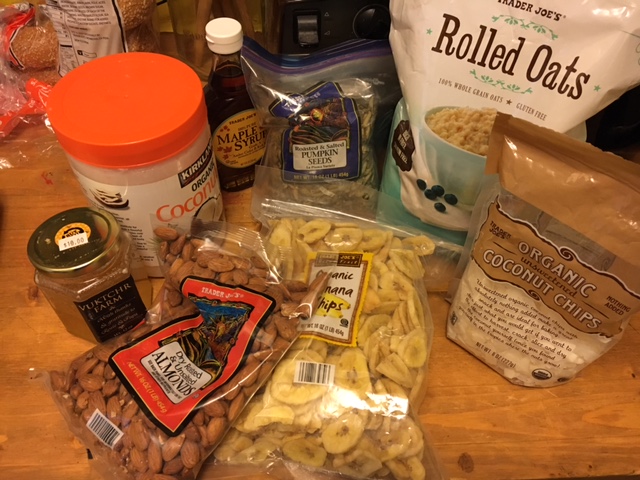
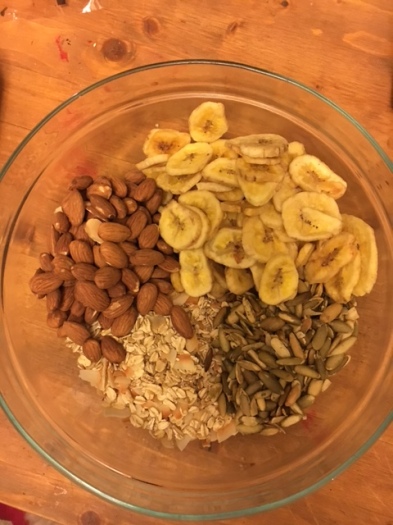
Here are some tropical banana, oat, toasted coconut and almond bars that are naturally sweetened, full of healthy fat and fiber to help get you through these long, dark winter days. You could always add some dried pineapple or mango for an extra tropical feel, just make sure your dried fruit doesn’t have any added sugar.


Tropical Oat Bars

Prep Time : 10 minutes | Total Time : 15 minutes
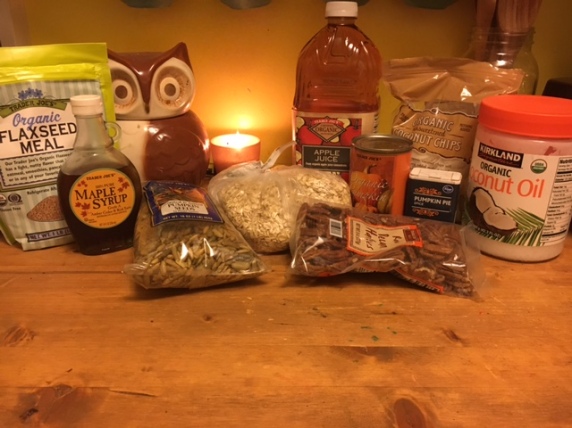
Ingredients

1/2 cup coconut oil

1/4 cup maple syrup

1/4 cup honey

1 1/2 cups oats (I used Trader Joe’s Gluten Free)

1 cup roasted and unsalted almonds

1/2 pepitas

1 cup banana chips

1/2 cup unsweetened coconut flakes

Instructions :

  • Preheat oven to 300 degrees
  • In a small saucepan, combine coconut oil, maple syrup and honey over heat on low until simmering.
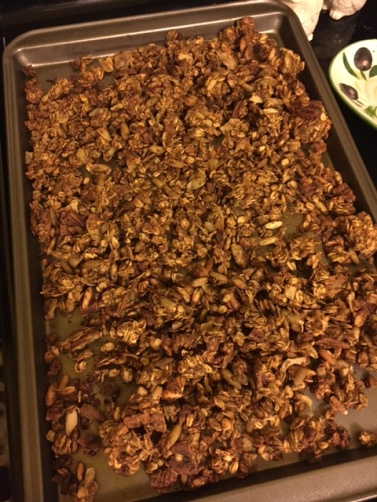
  • Spread oats and coconut flakes on a baking sheet and bake for 12 minutes (watch to make sure they don’t burn)
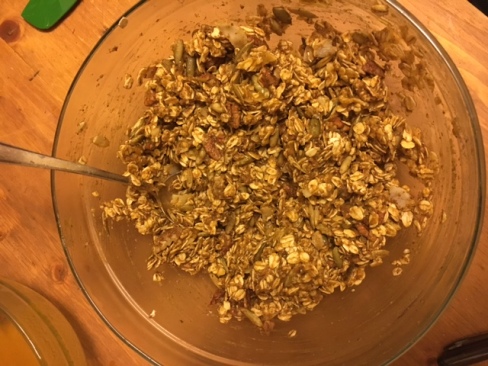
  • When oats and coconut flakes are done, mix in a  bowl with almonds, pepitas and banana chips and cover with oil and syrup mixture.


img_3230

  • Mix to combine and pour into 9X9 baking pan.
  • Place in refrigerator until solid, slice and enjoy. Store in refrigerator.


breakfast, easy, gluten free, quick, snacks, vegan

Maple Pumpkin Granola (GF, Vegan)

img_3085

I have been ready for fall for a while. Don’t get me wrong, I enjoy the sunshine and warm weather as much as the next person, but not all the time. There is something so comforting about the changing leaves, a slight chill in the area and the coziness of drinking a cup of tea and baking on a Sunday afternoon when it’s grey out. I also think that pumpkin is an underrated squash that only really gets hype around Halloween and Thanksgiving and love using it in all my cooking, including both savory things and sweet.

I’ve been craving some hearty granola, but most of the stuff you buy in the store has a lot of sugar and is highly processed. I wanted some granola that had all of the flavors of fall I love so much, but without the refined sugar. My criteria also included something with healthy fat and lots of plant protein.

Enter my maple pumpkin granola. It’s sweetened with a little maple syrup and some apple juice, pecans and pumpkin seeds for crunch, raw pumpkin for some yummy pumpkin flavor, flax meal for heart healthy omega 3’s and coconut flakes for something a little different.

I am so happy with how this granola turned out, my kitchen smelled amazing  and I could hardly wait to sample this when it came out of the oven. Not only is it delicious but it far exceeded my nutritional criteria and contains vitamins A and C, healthy fat, lots of protein, fiber and iron. I hope you will love this just as much as me, this was so easy to throw together in a few minutes and enjoy all week as breakfast or just a tasty snack.


img_2378

Maple Pumpkin Granola

Prep Time : 10 minutes | Bake time : 45 minutes

Ingredients :

2 cups raw oats

2/3 cup raw pecans

2/3 cup toasted pumpkin seeds (can also use raw)

1/3 cup unsweetened raw coconut flakes

1/3 cup flax meal

1 tbsp pumpkin pie spice

1/4 cup maple syrup

1/2 cup apple juice unsweetened

2 tablespoon coconut oil

1/2 cup raw pumpkin

Instructions :

Preheat oven to 350 degrees.

Combine dry ingredients in a large bowl and mix.

Combine apple juice, maple syrup and pumpkin in medium size bowl. Microwave coconut oil to melt and add to remaining wet ingredients.

Pour wet mixture over dry ingredients and mix thoroughly to coat.

img_2384

Spread on a large cookie sheet to cover. Bake for 20 minutes and stir. Bake for additional 20-25 minutes until golden brown and remove from oven and allow to sit and cool.

img_2387

Enjoy with almond milk or over yogurt or just by the handful which I ended up doing because it was too delicious to not snack on!

easy, gluten free, quick, snacks, vegan

Easy Energy?!

What? It’s that simple? Well, sort of. Choosing to put good fuel into your body will keep you going and help you tackle those meetings, your workout, and anything else that comes your way. A little planning will help you continue to stay on track no matter how busy, and these bites are just the thing for that! Whether I’m running to school, work or just a workout when I want something slightly sweet but also nutritionally balanced, I reach for these. They take minutes to pull together and are the perfect balance of protein, heart healthy omegas and fiber to help you feel full between meals and feel satiated! Enjoy!

Date Almond Bites 

Prep Time : 1 hour | Cook time : 10 minutes

Ingredients :

1 cup oats

10 dates

1/4 cup unsweetened shredded coconut flakes

2 tablespoons chia seeds

1/2 cup raw almonds

1 teaspoon cinnamon

Instructions :

1. Combine oats, cinnamon, chia seeds and coconut flakes in your food processor. Pulse until oats have broken down and you get a meal that looks like this.

2. Add dates and almonds to your food processor and continue to pulse until mixture begins to come together.

3. Your mixture will begin to ball up in your food processor, when this happens, pause and scrape down the sides and continue to pulse until it resembles this.

thumb_img_0324_1024

4. When you get the mixture, dump out your food processor and roll into 1 inch size balls and store in the fridge. When you need a quick snack grab a few and take them with you. Hope you enjoy!

Uncategorized

I’m a lazy student

So, being in school is hard. Like, really hard. Especially when you’ve been out for a long time like I have. That means that sometimes when I get home from school I am just too tired to think about cooking or coming up with something creative. Being in a nutrition program however, makes me even more conscious about wanting to eat nutritious, delicious and whole foods based meals. That’s where these tacos came in.

IMG_0123

I wanted to make something easy that didn’t really require a lot of cooking time – ta-da! Tempeh tacos! Literally, the only thing you will be cooking in this recipe is the tempeh. I let it marinate for a long while in some spicy hot sauce and then just sautéed it on the stove and threw it on a corn tortilla with some fixins.

You can feel good about eating these tacos because they deliver a great punch of vegan protein, fiber and vitamins and flavor! Hope you enjoy them as much as we did.


Lazy Spicy Tempeh Tacos with Cashew Cream Sauce

Prep time : 1.5 hours  | Cook time : 10 minutes

Ingredients

Organic Tempeh – One package

1/4 cup spicy hot sauce

2 tablespoons olive oil

1/2 cup black beans

1/2 cup corn

5 corn tortillas

1 avocado

1/2 cup raw cashews

1 tablespoon white wine vinegar

2 limes

1/4 – 1/2 cup water

Cilantro

Salt & Pepper

Pico de Gallo

Instructions

  1. Start by marinating your tempeh. I removed mine from the package and broke it up into crumbles, put it in a plastic bag and then dumped in the hot sauce. Massage the tempeh in the bag to make sure it’s all coated and stick it in the fridge for an hour or two.IMG_0108 (1)
  2. Next, get your cashews soaking, I used boiling water to speed this process up a bit. Cover the cashews and set aside to soak while the tempeh is marinating.
  3. When the cashews have soaked and are ready to go, drain off the soaking water. Combine cashews in blender with vinegar, lime juice, 1 tablespoon olive oil and 1/4 cup water. Blend until smooth. Add salt and pepper to taste. Add more water if necessary.
  4. Heat skillet on stove with remaining tablespoon of oil and add tempeh. Cook until slightly browned. IMG_0116
  5. You can warm the tortillas in the toaster if you like, and then assemble! Layer the tempeh, black beans, corn and avocado on top. Add pico de gallo if you like and fresh cilantro. Drizzle some of your delicious cashew cream on top to balance out the heat and enjoy!
chocolate, dessert, easy, vegan

Chocolate Chip Cookie Dough Truffles (vegan)

IMG_9531

Now that I have your attention, I have to start off by apologizing. I’ve been very bad and it’s been many moons since I last posted. That is mainly because of some exciting updates that have happened in the past year.

  • I got engaged! Woooh! If you’ve ever planned a wedding, you know, this is a full time job.
  • I quit my job! Hooray~ no more boring day job!
  • I went back to school full time! I am now a full fledged student at Bastyr University,  working on my degree in Nutrition and Exercise Science.

The reality is, I consider myself incredibly lucky to have the freedom to quit my day job, and pursue my dream to move into a world of eventual self employment and helping others through nutrition and movement plans to be healthier, happier individuals.

Even the healthiest person likes to indulge from time to time and I don’t know about you but cookie dough is just about my favorite thing in the world. I’m not even really a big cookie fan, most of the time I just make cookies to eat the dough and give away the cookies. So vegan cookie dough is the best case scenario because it’s completely safe to eat raw and why not just cut out the baked cookie in this equation and skip to what I really like eating. I mean, just look at this gorgeous cookie dough, don’t you just want to dive in?

FullSizeRender

I’m a few weeks behind on a Valentine’s Day post, but I made these beauties a few weeks ago when I felt like treating myself to something special. Valentine’s day does not have to just be about romantic love, love for your friends, pets, family  members and most importantly, yourself should also be recognized on this special day (not to mention every other day).

These cookie dough truffles were just the thing to hit the spot this year when I wanted something delicious, easy and somewhat indulgent while still containing healthier ingredients. I used vegan butter and organic coconut sugar and non-dairy chocolate chips so they are also cruelty free – winning! The coconut sugar really lends a more deep caramel flavor to these that make them stand out so I recommend not subbing the sugar.

IMG_9510

I hope the next time you feel like you want to take a little extra effort show yourself a bit of self love, you’ll consider these lovely bites, not just on Valentine’s Day but any day.

IMG_9505


Chocolate Chip Cookie Dough Truffles (vegan)

Easy to make truffles for yourself, your special someone, or any party to impress your friends. These truffles look super fancy, taste incredible and are completely vegan! 

Servings : 20           Time : 1 hour

Ingredients

1 stick vegan butter (room temperature)

3/4 cup organic coconut sugar

1 ½ teaspoon vanilla

¼ teaspoon salt

1 cup whole wheat pastry flour

2 tablespoons non-dairy milk (I used rice)

½ cup mini chocolate chips (non dairy)

1 teaspoon coconut oil

1 package dark chocolate chips (non dairy)

Red and white sprinkles

Instructions

Truffle Filling

  1. Cream together sugar and vegan butter until fully combined and no lumps remain.
  2. Add vanilla, salt and non dairy milk and stir to combine.

FullSizeRender 5

3. Gradually add flour until completely mixed in.

IMG_9514

4. Stir in mini chocolate chips (I used about a 1/2 cup but more is always ok in my book)

IMG_9515

5. Using a spoon, create rounded spoonfuls and place onto baking sheet. Put into fridge for 30-45 minutes to firm up.

IMG_9519

Truffle Assembly 

About 5 minute before your truffles are completely chilled, combine your dark chocolate chips and coconut oil in a microwave safe bowl.

Heat on high in increments of 30 seconds, stirring frequently to get a smooth, completely melted shiny mixture.

IMG_9523

Throw those chilled cookie dough balls in to their delicious chocolate bath and roll them around and make sure they are completely coated. Set them back in their pan and let dry for a few seconds before topping off with some sprinkles of your choosing. I did red and white for valentine’s day but these would be great for any occasion with no sprinkles or any color.

*One note on the sprinkles, you want to wait a few seconds so they don’t get completely absorbed into the chocolate but not too long or they won’t stick. If you see the chocolate getting hard, you’ve waited too long.

IMG_9524

Once they are all coated in chocolate and sprinkles, stick them back in the fridge for a few minutes so the chocolate can firm up. When they’re ready, take these little balls of heaven out and enjoy! You will want to store these in the fridge but they can be left out for a while if you are taking them to a party or serving them to guests. But if you’re like me, and you save them all for yourself, that won’t be necessary 🙂


Hope you guys enjoy these as much as I did and thanks so much for sticking with me through my very long hiatus. I promise to be more diligent and bring you lots of inspiring yummy posts in the future!

Cheers!


dinner, gluten free, risotto, vegan, vegetarian

Spring Risotto with Vegetables

IMG_5735

We all have a dish that we’ve mastered and love to make. Maybe, this dish also happens to be something people love and are easily impressed with. In my case this is risotto.

I know we’ve talked about risotto before, but I love it so much and it’s really become the thing I make for dinner when I don’t want to think about cooking. The good thing about risotto is that you can really add anything to it and make it delicious. Once you master the basics of cooking the rice, the possibilities are endless for what you can make.

My hope is that I’ll inundate you with enough risotto recipes over time that one of them will really spark your interest to try it. Then, as time goes on, you’ll try another and another until it too is your go to dinner option when you want something delicious, easy and comforting.

Since I’m starting to feel springy I decided to throw together a risotto with some green veggies to help get those much needed daily vitamins and antioxidants in the most delicious way possible. This recipe is vegan (without the fried egg) and offers great protein from the edamame even if you choose to forgo the egg option. It’s creamy, comforting and feels decadent without a lot of empty calories.

I encourage you to try this one, but if it’s not this risotto, then hopefully the next, or the one after that 🙂

IMG_5753


Spring Risotto with Asparagus, Zucchini and Edamame

Prep Time : 10 minutes | Cook Time : 40 minutes | Serves 4

Ingredients : 

1 cup arborio rice

1 32 ounce vegetable broth

1/4 cup house white wine

1 small yellow onion

2 cloves garlic

2 medium zucchini

1 large bunch asparagus

1/2 cup frozen shelled edamame

2 eggs (optional)

1 tablespoon vegan margarine

1 tablespoon olive oil

2 tablespoons avocado oil

salt & pepper

IMG_5733

Instructions : 

1. Preheat oven to 350 degrees.

2. Add broth to a medium saucepan and warm over low heat.

3. Wash and clean asparagus and zucchini if desired. Slice zucchini lengthwise twice and chop into medium size pieces shown above. Cut off ends of asparagus and slice stalks into bite size pieces. Toss with avocado oil and salt and pepper and place on baking sheet and place in oven once preheated. Cook for 15 minutes stirring once and check doneness. You want them to be cooked  but still a bit firm since you will add them to the risotto and cook further.

IMG_5739

4. While you’re waiting for the oven to preheat, dice onion and garlic. In a large saucepan, heat olive oil and melt margarine over medium heat. Add garlic and onion and saute to soften and release aroma, approximately 2-3 minutes. Add rice to pan and saute for about 3-4 minutes until rice is a bit toasty. Add wine to pan and cook until absorbed.

IMG_5732

IMG_5736

5. Once all the wine has been absorbed, start adding broth a bit at a time. I honestly never measure this because I always end up using all the broth so just pour some in and use your best judgement. Continue cooking over medium heat, stirring often until liquid is absorbed. Repeat until broth is gone.

6. When vegetables are done, remove from oven and set aside. Remove edamame from freezer and cook according to instructions and set aside.

 IMG_5745

IMG_5743

7. Taste risotto to test doneness-best part of the process 😉 and when it’s almost done add your vegetables. A good way to know this is that you have 1/4-1/2 cup of broth left and its a BIT crunchier than you would normally like. We want to it to stay a bit al dente but not fight back.

8. Continue to cook with vegetables and until all broth is gone. Season with salt and pepper to your liking, in my experience this and a good broth with the roasted veggies will add enough flavor but I think nutritional yeast could be good or even garlic powder.

9. When it’s done, scoop it into your bowls and get ready to feast and enjoy! If you want to add a fried egg, see below.

IMG_5750

10. You decided you wanted a little something extra did you? No shame in that friend! I’m going to assume you’ve fried an egg before but for the sake of explanation I’ll continue. Get yourself a small skillet, spray with non stick spray and heat over medium heat. Crack your egg into pan and cook just until the white is opaque and flip, about 1-2 minutes. Flip over and cook for about another minute, you don’t want to overcook because you want the yolk to be runny. Something like this.

IMG_5751

11. After you flip that sucker over and it’s done, throw it on your risotto, break open that yolk, stir and get to enjoying!

IMG_5755

IMG_5756

Happy feasting!

dinner, easy, quick, shrimp

Simple Lemon Pasta With Shrimp

IMG_5729

Sometimes you just want a super simple dinner, no frills, nothing crazy, just some delicious eats. While I love meal planning most of the time, there is a wonderful freedom about looking in your fridge and pantry and throwing together something with what you have already. In my case it led to this really simple pasta that we loved!

We’ve previously established a shrimp passion in our house and it had been a while since I pulled these babies out of the freezer. Not only are they super delish but they are also a powerhouse of awesome stuff you need! They are super low in calories, high in protein and a great source of iron and omegas, who doesn’t want that?

I love the bite of the arugula in this dish works really well with the lemon and shrimp, its light, refreshing and filling without weighing you down.This comes together super quick so if you’re feeling extra lazy or running late, it’s the perfect dish.


Simple Lemon Pasta with Shrimp, Tomatoes and Arugula

Prep Time : 5 minutes | Cook time : 15 minutes | Serves 2

Ingredients : 

4 oz whole wheat spaghetti

20 large shrimp (we like to use a lot)

2 lemons

15 grape tomatoes

1 large handful or arugula

4 tablespoons olive oil

Salt & Pepper

Lemon pepper

Instructions : 

IMG_5724

1. To assemble lemon sauce, squeeze juice of lemons into a mason jar or bowl.Zest one lemon and add with 2 tablespoons olive oil and salt and pepper to taste. Shake or stir to combine, taste and set aside.

2. Use 1 tablespoon olive oil and toss with shrimp, add salt and lemon pepper to taste. Set aside.

IMG_5728

3. Bring water to boil on stove, salt the water, add pasta and cook to al dente.

4. While pasta is cooking, halve your tomatoes and set aside with arugula.

IMG_5726

5. When pasta is done, drain pasta and reserve 1/4 cup pasta water and add back to pasta.  Heat skillet with remaining olive oil and add shrimp to cook on medium high until pink, approximately 4-5 minutes.

6. When shrimp are done cooking, add to cooked pasta. Throw in your chopped tomatoes, a big handful of arugula and pour in your lemon olive oil sauce. Toss all ingredients to combine and enjoy! I threw some lemon zest on top to make it extra lemony and it was great.

IMG_5730

IMG_5731

This was so good we went back for seconds but it was even better the next day for leftovers. Eat up!

dinner, vegan

Creamy Asparagus Soup (Vegan)

IMG_5765

My beautiful and wonderful mother came to visit us this week from the magical land of Idaho. It’s about a 9 hour drive from her door to ours so I end up chatting with her during the drive to make it go faster, mostly for me since I can’t wait to see her. While chatting this time she mentioned since this trip over will be a bit longer than normal she had cleaned out the items in her fridge before leaving, and she was bringing a bunch of asparagus.

I love asparagus, it smells like summer to me, putting it on the grill and eating it with your hands while the sunlight fades. Unfortunately on this day it was rather rainy and chilly in Seattle so I decided to go another route this time. Manfriend had also been fighting off a cold so I thought some warm comforting soup would hit the spot for everyone.

I started this soup with no real plan and it somehow came together incredibly. This is one of the easiest things I’ve done and is so healthy and fulfilling. Since the soup is creamy I decided to make some homemade croutons to contribute some crunch on top and they were the perfect addition. Give this a try the next time you want an easy weeknight meal, enjoy!


Creamy Vegan Asparagus Soup with Homemade Croutons

Prep Time : 10 minutes | Cook Time : 30 minutes | Serves : 4

Ingredients :

Soup

1 large bunch fresh asparagus

1/2 yellow onion

3 large cloves of garlic

Avocado Oil

Salt & Pepper

Thyme

3/4 cup Vegetable Stock

1/2 cup Garlic Cashew Cream Sauce (See recipe here)

Ingredients :

2 large slices of french or other bread

Avocado Oil

Salt & Pepper

Thyme

Instructions :

1. Preheat oven to 400 degrees. Chop asparagus into medium size pieces. Chop onion into large pieces. Toss asparagus with onion and garlic (in skin) in drizzle of avocado oil and toss with salt and pepper and thyme and place in oven. Roast for 15-20 minutes until cooked.

IMG_5757

2. Remove vegetables from oven and let sit for 5 minutes to cool. Remove garlic from skin and place with asparagus and onion in blender. Add vegetable stock and cashew cream and blend to combine all ingredients. Add salt and pepper to taste. You can add less stock if you like a creamier soup, but this works out really well.

3. When you remove vegetables from oven, turn heat down to 350 degrees. Cut bread into large cubes and toss with oil, salt, pepper and thyme. Cook in oven for 10 minutes or until lightly browned and crispy.

IMG_5758

4. Remove soup from blender (my vitamix heats the soup if you leave it in there, otherwise, microwave if necessary to warm up) and pour into bowls to serve.

5. Add toasted croutons on top and enjoy! I added a dollop of cashew cream sauce on top and it rocked!

IMG_5769

IMG_5764

dinner, gluten free, weeknight

Spicy Shrimp Tacos

IMG_5722

We love shrimp.  We  buy the massive packages at Costco that should probably take normal people months to go through and devour them in weeks. They are so delicious and easy to cook, they’re a great option to turn to for protein and iron. I tend to put our shrimp with polenta or pasta but last night I wanted to do something different.

Last weekend we were down in California visiting some good friends and they took us to a super delicious restaurant featuring all sorts of yummy vegan options. We ended up sharing a spicy tomato pizza with a creamy cashew sauce that was incredible. I seriously could not tell it wasn’t dairy and it just added this extra level of deliciousness to the pizza.

I’ve been wanting to try getting into non-dairy creamy sauces for a while and thought I’d give it a try with this cashew based sauce. It was intimidating at first, and admittedly you do have to do some groundwork, and incorporate time to soak the cashews for a while but with a bit of planning it comes together super easy. It’s so delicious and full of good fat, protein and magnesium- you won’t even miss the dairy.

Making your own pico de gallo is also crazy easy and only takes a few ingredients. I made my ahead of time so the flavors could marry and develop. This recipes just takes a bit of prep work, let your ingredients sit and then take a few minutes to pull it all together. Great for a weeknight dinner or even for a group of friends.


 IMG_5713   IMG_5701

Spicy Shrimp Tacos with Pico de Gallo and Garlic Cashew Cream Sauce

Prep Time : 2 hours | Cook Time : 10 minutes | Serves 2

Ingredients : 

Pico de Gallo 

4 roma tomatoes

1/2 red onion

2 limes juiced

1 large clove garlic

1 tablespoon chopped cilantro

Salt

Shrimp

20 large shrimp

2 tablespoons olive oil

Salt & Pepper

1 teaspoon Paprika

1 teaspoon Garlic Powder

1 teaspoon Cayenne Powder

Other Ingredients :

Corn Tortillas

Avocado

Instructions :

1. For the pico de gallo, chop all ingredients for salsa and stir together with lime juice in a bowl. Add salt to taste. Let sit in fridge for at least half hour before serving.

IMG_5709

2. Toss the shrimp with a olive oil and coat. Sprinkle with spices, add more or less cayenne depending on your spice preference. I let this sit in the fridge too for a few hours to let the flavors marinate but you can definitely do this right before and cook.

3. When ready to put tacos together, cook shrimp over medium high heat for about 5 minutes until opaque throughout. Assemble tacos with shrimp, pico de gallo, avocado slices and cream sauce.

IMG_5719


Garlic Cashew Cream Sauce

Ingredients :

1 1/2 cups raw cashews

1/2 cup cold water

2 teaspoons apple cider vinegar

2 teaspoons garlic powder

1 teaspoon salt

Instructions :

1. To prep the cashews, soak them in a bowl with water covering at least an inch. You want to let them sit at least a half hour but I let mine sit for a couple hours.

IMG_5714

2. When they are done soaking, throw them in the blender with 1/2 cup water and vinegar and let it blend. It will take a while but you want to let this go until it gets to a smooth consistency.

3. Add salt and garlic powder, I think fresh garlic would also be super great in this or roasted garlic, I just was feeling lazy. In the end you get a super creamy, rich sauce that compliments the freshness of the pico de gallo and the spiciness of the shrimp.

IMG_5717

Try these tacos out on your next taco Tuesday for something a bit different and dairy free. Make the time to prep the stuff ahead of time and then go have yourself a nice glass of wine and enjoy some netflix, when it’s time to eat throw it all together and enjoy! Have a fantastic weekend!

IMG_5721

recipe, snacks

Powerhouse Protein Bars

IMG_5688

I’m not really a fan of super processed foods. A couple years back my friend and I decided to learn how to better make pie and we decided to dedicate a year to pie making, one a month.  It was super fun to get together each month and try new things and obviously eating pie together wasn’t so bad either.

After that we started making all sorts of stuff from scratch and working on perfecting our skills at making everything from cheese to lip balm. What I realized is that just about everything out there from body scrubs to protein bars can really be made from scratch. Sure, some are more intimidating than others and take more time, but really, there are very few things you can’t handle yourself. And the best part-you get to control what goes into it and make it exactly what you want, what’s better than that?

Since I don’t eat meat, and do a lot of running I have to find new ways to get enough protein to keep my muscles happy. The other night while puttering around in the kitchen, I started pulling out things I thought would work together and these protein bars were born. For a first iteration I have to say I’m really happy with them and hope you will be too. These bars are rich and chocolaty with no refined sugar, they give you energy and keep you full. What you get are gluten free vegan bars with a great mix of healthy fat, omegas, antioxidants and balanced protein, all with no crazy weird ingredients! Yay!

IMG_5698


Dame’s Powerhouse Protein Bars

Total Time : 15 minutes | Servings : 12 bars

Ingredients :

1 cup dry quinoa

1 cup oats

1/2 cup chia seeds

2 tablespoons flax meal

1 cup peanut butter (can also use almond)

1/4 cup dark cocoa powder

1/4 cup rice protein (can omit)

4 tablespoons coconut oil

2 tablespoons honey (optional)

Instructions :

1. Preheat oven to 350 degrees. Spread rinsed and dried quinoa and oats on baking sheet. Bake for about 10 minutes to toast grains.

IMG_5689

2. When grains come out of oven, in a saucepan over medium low heat combine peanut butter, cocoa powder, protein powder, coconut oil and honey if you use it.

3. Pour dry oats and quinoa in bowl and add chia seeds and flax meal. When liquid mixture is combined pour on top of dry ingredients and combine.

IMG_5694

4. Pour mixture into a lined 8X8 pan and put into fridge to firm up. I have to admit I was tasting these before they were done 🙂

5. After about 30 minutes remove from fridge and slice into bars.

IMG_5697

IMG_5698

Give these a try, they are fantastic and super easy to pull together.  I kept these in the fridge but they are great to grab in the morning and take to work or keep in your gym bag to refuel after a hard run with.

Enjoy!